When my kids were little, garlic bread was practically a currency in our house. If I needed them to sit still for just ten more minutes—while I wrestled with a science project volcano that wouldn’t erupt or waited out one of those silent teenage sulks that can stretch on like Lent—I could buy their patience with a warm loaf of garlic bread. It didn’t matter if it came from the freezer section wrapped in foil or was some slightly-too-browned baguette I buttered at home, the smell alone was a peace treaty.
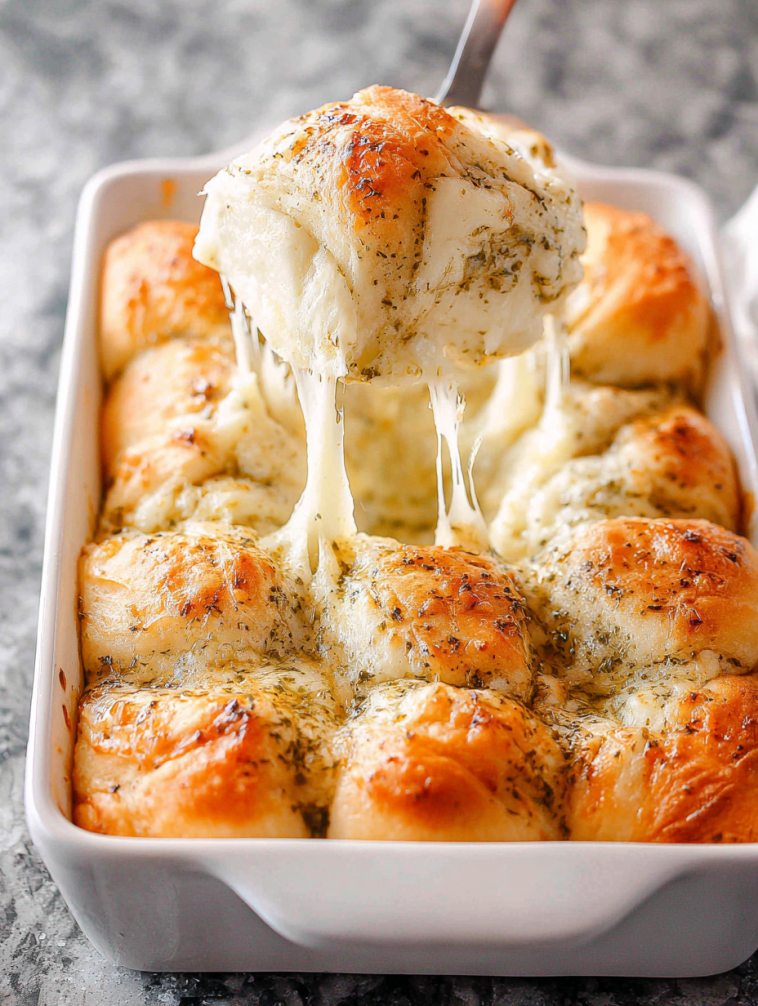
But these stuffed garlic cream cheese rolls—oh my word—those belong to another chapter of life. I started making them after my oldest moved out. I’d find myself baking just to fill the silence, you know? The Hawaiian rolls felt like a cheat code, soft and sweet already, and the cream cheese stuffing was something I stumbled into because the fridge was bare except for half a block of it and a bag of mozzarella from some forgotten pizza night. I remember the first time I pulled them out of the oven, I thought: this would have ended so many dinnertime squabbles back in the day.
Of course, I still make them when the kids come home, though now they raid the fridge like bandits and tell me not to fuss. But when the smell of garlic butter hits them, they hover in the kitchen, same as when they were eight and ten. Some things don’t change, even if the people do.
Why You’ll Love It
-
Because nothing says comfort like a warm roll oozing with cream cheese and garlic. I mean, you can’t argue with that.
-
They’re quick. Twelve minutes in the oven is basically one good story’s worth of time—by the time you’ve finished telling your daughter about how the neighbor’s dog chased you down the street, they’re ready.
-
They make people linger. Friends who were ready to leave after dinner suddenly stay for “just one more” when these come out. There’s something sticky about cheesy bread in that way—it keeps the room full.
-
Honestly, the smell. I wish I could bottle it and spritz it on the days I don’t feel like getting out of bed.
Ingredient Notes
-
Hawaiian Rolls: Don’t fight it. Their sweetness is the secret. I tried plain dinner rolls once—they turned out fine, but not magic. If you don’t have Hawaiian rolls, brioche is a decent substitute.
-
Cream Cheese: I prefer full-fat. I tried low-fat once and the texture got oddly watery. Like it was sulking.
-
Mozzarella: The melt factor is important. Pre-shredded is fine, but if you shred it yourself, it clumps together beautifully with the cream cheese.
-
Parmesan: Adds the sharpness to balance out all that creaminess. Don’t skip it. Even the stuff in the green shaker can will do in a pinch (I know someone will roll their eyes, but life is too short for cheese snobbery).
-
Garlic: Fresh cloves are best. Don’t let anyone tell you that jarred garlic is “just as good.” It isn’t. (Though, between us, I have absolutely used it at least a dozen times when I was tired.)
-
Italian Seasoning: I used to mix my own from oregano, thyme, basil… but these days I use the premixed jar because it’s easy, and who needs more half-used bottles of dried herbs cluttering the spice rack?
-
Instructions (My Messy Version)
-
Preheat your oven to 375°F. Don’t forget this step—once, I filled every single roll, butter dripping everywhere, only to realize the oven was still cold. I had to just sit there staring at them for fifteen minutes while it preheated. Torture.
-
Butter your baking dish—7×11 or 9×13 works, but if it’s smaller, they’ll cozy up together, which I like.
-
Separate the rolls. With a sharp knife, cut an “X” in the top of each roll, but be gentle. You don’t want to slice through the bottom (I’ve done it—cheese leakage is no joke).
-
Use the handle of a wooden spoon (or even your pinky if you don’t mind sticky fingers) to widen the hole.
-
Beat the cream cheese until smooth. Mix in 1½ cups mozzarella, the garlic, and 1½ teaspoons Italian seasoning. It should be thick and messy.
-
Transfer the mixture into a piping bag (or a zip-top bag with the corner cut). This is the only way to avoid frustration. Spoon-filling works, but you’ll end up cursing softly under your breath.
-
Fill each roll until it’s practically bursting. Don’t be shy—the more, the better.
-
In another bowl, stir together melted butter, the remaining Italian seasoning, and garlic powder. Drizzle this over the rolls, letting it seep into the cracks.
-
Sprinkle the tops with the rest of the mozzarella and parmesan. Don’t worry if it falls into the pan—those bits become little crispy treasures.
-
Bake for 12–14 minutes, until everything is melty and bubbling and golden.
Eat one immediately, even if you burn your tongue. It’s a rite of passage.
-
Variations & Substitutions
-
Spicy Kick: Add red pepper flakes to the filling. My son swears by this, though he piles on so much that his eyes water.
-
Bacon Lovers: Crumble in some cooked bacon with the cream cheese mixture. Not traditional, but oh my, it works.
-
Herby Twist: Fresh parsley or chives stirred into the filling give it a fresher taste. I sometimes do this in the spring when I’m desperate for green things.
-
Different Cheeses: Swap half the mozzarella for sharp cheddar. It makes the rolls taste a little more like a pub snack.
-
Vegan-ish: I once tried making these with vegan cream cheese and shredded “mozzarella-style” stuff for a neighbor. They weren’t the same, but she cried anyway because it reminded her of her grandmother’s bread. So maybe it’s about the effort, not the perfection.
Storage & Reheating Tips
-
These are best the same day. No question. The rolls go a bit soggy overnight.
-
If you do keep leftovers, wrap them tightly in foil and store in the fridge for up to two days.
-
Reheat in the oven at 350°F for 8–10 minutes. Microwaving works in a pinch, but the bread gets rubbery (I’ve done it while standing in my robe at midnight, and I regret nothing).
-
Freezing? I wouldn’t. But I imagine you could—I just don’t like what it does to cream cheese.